
Why you can trust Sunlight Media
- Expertise and Experience:Our content is crafted by seasoned professionals with extensive experience in digital marketing, ensuring you receive accurate and actionable advice.
- Unbiased Information:We provide impartial insights and recommendations based solely on what's best for your business, without any hidden agendas or promotions.
- Thorough Research:Our articles are backed by comprehensive research and the latest industry trends, ensuring you stay informed with reliable and up-to-date information.
- Transparency and Honesty:We believe in complete transparency. We disclose our sources, methodologies, and any potential conflicts of interest, so you can trust the integrity of our content.
- Continuous Improvement:We constantly review and update our content to reflect the latest developments in digital marketing, so you always have access to the most current and relevant information.
Expertise and Experience: Our content is crafted by seasoned professionals with extensive experience in digital marketing, ensuring you receive accurate and actionable advice.
Unbiased Information: We provide impartial insights and recommendations based solely on what’s best for your business, without any hidden agendas or promotions.
Thorough Research: Our articles are backed by comprehensive research and the latest industry trends, ensuring you stay informed with reliable and up-to-date information.
Transparency and Honesty: We believe in complete transparency. We disclose our sources, methodologies, and any potential conflicts of interest, so you can trust the integrity of our content.
Continuous Improvement: We constantly review and update our content to reflect the latest developments in digital marketing, so you always have access to the most current and relevant information.
Knowing how to backup my website is a cornerstone of maintaining a secure and resilient online presence. Although backups might not be at the forefront of your mind when your WordPress website is running flawlessly, they are a vital contingency plan for unexpected situations. Given that WordPress is the backbone of an extensive part of the web, being ready for any hitches is not just advisable—it’s necessary.
For users with large sites or extensive media files, having unlimited backup storage is crucial. It allows you to back up your entire site without worrying about server space limitations or escalating storage costs on cloud services.
Backing up a WordPress site, particularly for those with heavy traffic or e-commerce functionality, may initially appear daunting. However, the procedure is straightforward. This guide will walk you through the steps for a quick and effective backup, ensuring your website remains unassailable in the long term.
Introduction to Backing up Your WordPress
Backing up your WordPress site is a crucial step in ensuring the security and integrity of your online presence. A reliable WordPress backup plugin can help protect your site from data loss, crashes, and other disasters. With so many WordPress backup plugins available, it’s essential to choose the best one for your needs. In this section, we’ll introduce you to the world of WordPress backups and provide an overview of the importance of backing up your site.
Imagine spending countless hours perfecting your website, only to lose all your hard work due to a server crash or a malicious attack. This is where WordPress backups come into play. By regularly backing up your WordPress site, you create a safety net that allows you to restore your site to a previous state in case of any mishaps. Whether you run a personal blog, an e-commerce store, or a corporate website, having a solid backup strategy is non-negotiable.
A WordPress backup plugin simplifies the backup process, making it easy to schedule automatic backups and store them securely. These plugins can back up your entire site, including your database, themes, plugins, and media files. By automating the backup process, you can ensure that your site is always protected without having to remember to perform manual backups.
Choosing a Backup Method
When it comes to backing up your WordPress site, you have several options to choose from. You can use a WordPress backup plugin, such as UpdraftPlus or Duplicator, to automate the backup process. Alternatively, you can use cloud storage services like Google Drive or Amazon S3 to store your backups. Manual backups are also an option, but they can be time-consuming and prone to errors. In this section, we’ll explore the different backup methods available and help you choose the best one for your site.
Using a WordPress backup plugin is one of the most convenient and efficient ways to back up your site. Plugins like UpdraftPlus and Duplicator offer automated backup schedules, allowing you to set it and forget it. These plugins can also integrate with cloud storage services, providing an extra layer of security by storing your backups offsite.
Cloud storage services, such as Google Drive and Amazon S3, are excellent options for storing your backups. They offer secure and scalable storage solutions, ensuring that your backup files are safe and easily accessible. Many WordPress backup plugins support cloud storage integration, making it easy to save your backups to remote locations.
Manual backups involve exporting your site’s database and files manually, either through cPanel or an FTP client. While this method gives you complete control over the backup process, it can be time-consuming and requires a certain level of technical expertise. Manual backups are best suited for users who are comfortable with handling their site’s files and databases directly.
WP Engine Backup Features
Using WP Engine for your WordPress backup needs makes the process incredibly smooth. After installing the WP Engine plugin on your site and entering some FTP details for synchronization, you’ll be set. WP Engine is an ideal solution for any WordPress site, boasting compatibility with most up-to-date versions of WordPress and its myriad plugins. With WP Engine, you can take advantage of automated, scheduled backups to preserve critical site data, and easily restore backups, so the concern of website downtime becomes a thing of the past.
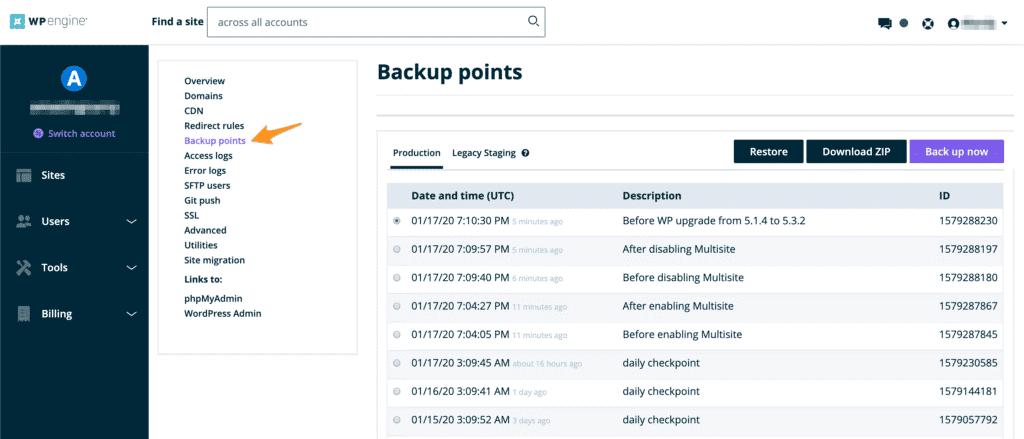
How to Access WP Engine Restore from Backup Options
To find and manage your backup settings, navigate to the “Backup Points” page within the User Portal by following these steps:
- Log into the User Portal.
- Select the name of the environment you wish to manage.
- Click on “Backup Points.”
This way, you’ll have all the tools you need for WP Engine restore from backup right at your fingertips. WP Engine makes it easy to restore backups efficiently, ensuring your data is always safe and accessible.
Make a Backup Checkpoint
- Access the Backup Points page in the User PortalClick on “Backup Now”
It is crucial to schedule backups to ensure regular data protection and minimize the risk of losing recent changes due to errors or unexpected events.
A new window will appear with the following fields: Backup description: Provide a name, such as “Before updating plugins. “Send notification to Enter email addresses separated by commas to receive a notification upon completion of the backup.
Click Create environment-typeBackup
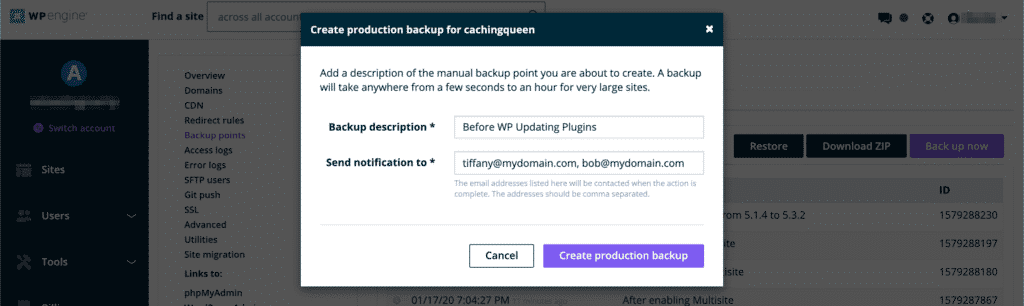
Please note that the email notification may be sent to your
Please note that the email notification may be sent to your Junk or Spam folder. Don’t forget to check these folders in your inbox to ensure you receive the notification.
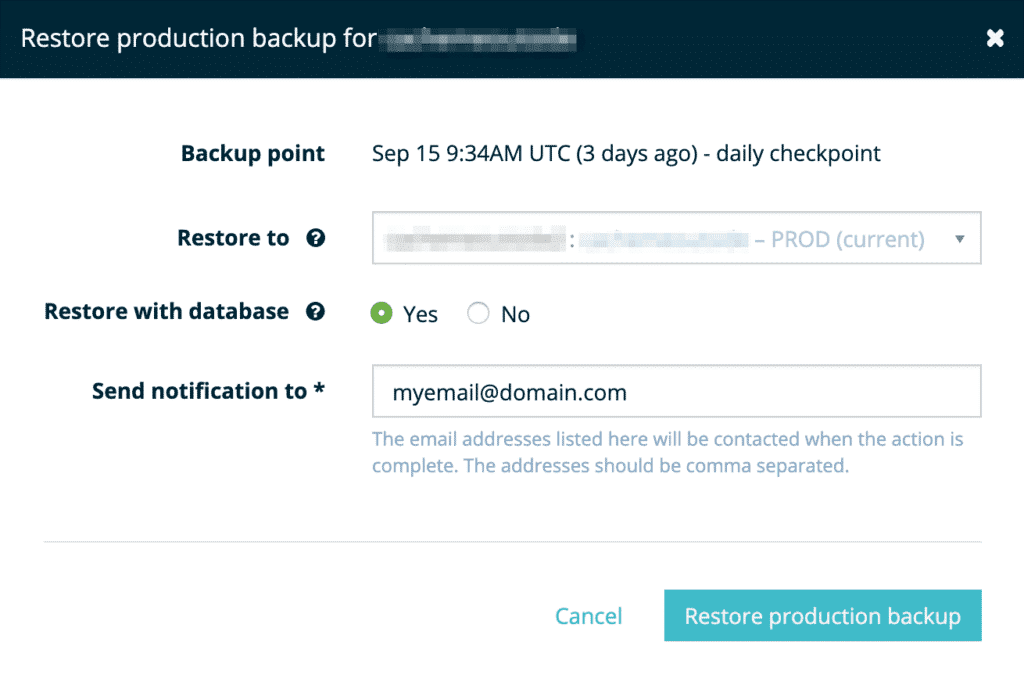
Restore a Backup
To revert your website to a previous version:
Open Backup Points in the User Portal
Select a backup from the list by clicking the corresponding radio button.
- Note: Backups are in UTC server time.
- Click “Restore”

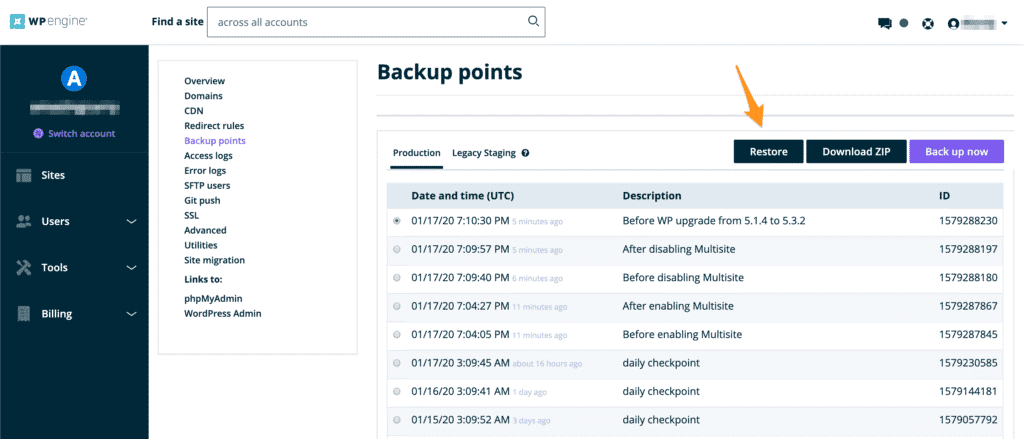
A new window will appear with the following fields:
Restore to: Choose an environment name to restore the backup to
Restore with database: Check the box to restore database information or uncheck it to restore files only. Note that partial database selection of specific tables is not available.
Send notification to: Enter email addresses separated by commas to receive a notification upon completion of the restore.
Click “Restore Backup”
The automated restore process may take anywhere from a few minutes to several hours, depending on the size of your site and the number of files. Once the restore is completed, an email will be sent to the listed email addresses.
Note:
- The email notification may be sent to your Junk or Spam folder, so don’t forget to check these folders in your inbox.
- If you restore the backup to another environment, the source environment that the backup belongs to will not be affected.
- The restore process is destructive, meaning all content will be overwritten on the destination environment to match the content of the selected backup point. This means that files present on the destination and not in the backup chosen point will be deleted upon restoration.
The automated restore process can take anywhere from a few minutes to several hours. This largely depends on the size of your site and the number of files. An email will be sent to the email addresses listed when the restore has completed.
It’s possible for the email notification to be filtered into Junk or Spam. Be sure to check these email folders.
If you choose to restore the backup to another environment, the source environment that the backup belongs to will not be impacted.
The restore process is destructive, meaning all content will be overwritten on the destination environment to match the content of the backup point selected. This means files present on the destination, if not present in that backup point, will be removed from the destination upon restore.
What Does “How to Backup My Website WordPress” Mean?
When looking to understand how to backup my website WordPress, it’s essential to recognize that a complete backup is crucial for ensuring all site data, including files and databases, is protected and can be fully restored if things go awry. There are multiple avenues for creating a backup of your WordPress website, such as utilizing hosting services like WP Engine, employing a dedicated WordPress backup plugin, or even manually handling the backup process. For those seeking a reliable and secure platform to host your WordPress website, you might consider exploring a web hosting service that offers robust backup solutions.
It’s crucial to understand that all backups are not created equal in terms of their reliability and effectiveness. Consistently backing up your WordPress website is imperative to prevent the loss of important data. This becomes doubly important for sites handling sensitive content, including customer information, transaction records, or legal documents. Backups serve as a safety net against a range of risks like server crashes, malware infiltration, or human errors that can cause the loss of months of labor and essential data. For instance, if you’re using WP Engine, you might want to know how to delete an environment, but ensuring you have a proper backup before doing so is vital.
What’s the Latest Version of WordPress as of Now?
As of February 13, 2023, WordPress is currently on version 6.0. This substantial update was rolled out on May 24, 2022, introducing several new features to the platform. The enhancements focus primarily on complete site editing capabilities, with additions like new block types, a more robust block editor interface, style-switching options, and improved text and writing controls.
About WordPress 6.2 Beta 1
On February 7, 2023, WordPress announced the availability of WordPress 6.2 Beta 1 for download and evaluation. It should be noted that this version is still undergoing development and is not advisable for use on critical sites requiring high reliability. If you’re interested in testing this beta version, it’s recommended to install it on a test environment or server for evaluation purposes.
Alternative methods to Backup WordPress
Not hosted with WP Engine? Here are some alternative tips to help backup your WordPress website using a variety of plugins, tools and WordPress hosting accounts.
To safeguard your database and files, it’s crucial to manually back up your WordPress site prior to executing any updates. For an in-depth manual on both backup and update protocols, please consult the Updating WordPress Codex Page.
Duplicator is primarily a migration plugin designed for site migrations rather than restoration. While it can also perform backups, its main focus is on facilitating the migration process, implying that users should have some technical knowledge to utilize it effectively.
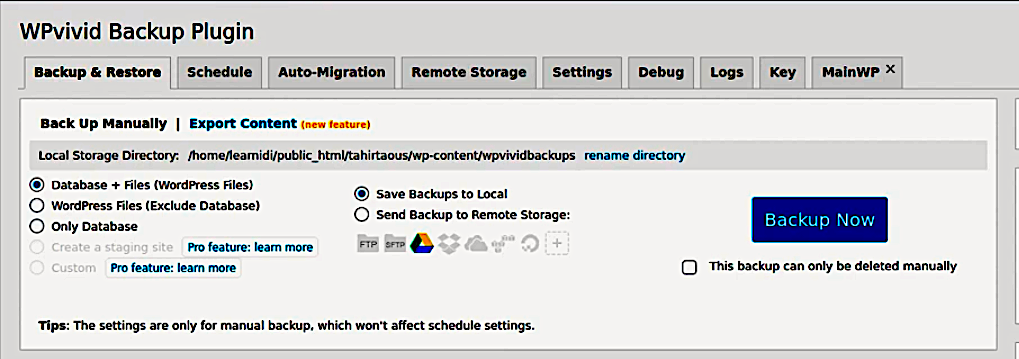
Here’s how to perform a manual backup of your website using WPvivid Backup:
- Go to the “WPvivid Backup” tab. Within this tab, you’ll find three choices: “backup and restore,” “export and import,” and “settings.” 2. Click on the “backup and restore” option, which will launch in a new tab. This interface showcases all your manual and automatic backups, along with restore possibilities, all in one convenient location.
Cloud Storage for Backups
Cloud storage is a popular option for storing WordPress backups. Services like Google Drive, Amazon S3, and Dropbox offer secure and reliable storage for your backup files. When choosing a cloud storage service, consider factors like storage space, security, and ease of use. Some WordPress backup plugins, like UpdraftPlus, offer integration with cloud storage services, making it easy to store and manage your backups. In this section, we’ll discuss the benefits and drawbacks of using cloud storage for your WordPress backups.
One of the main advantages of using cloud storage for your WordPress backups is the added security it provides. By storing your backups offsite, you protect them from local server failures, hardware issues, and other on-site disasters. Cloud storage services are designed to be highly reliable, with multiple redundancies in place to ensure your data is always available when you need it.
Another benefit of cloud storage is its scalability. As your website grows and your backup needs increase, you can easily upgrade your storage plan to accommodate more data. This flexibility makes cloud storage an ideal solution for websites of all sizes.
However, there are some drawbacks to consider. Depending on the cloud storage service you choose, there may be additional costs associated with storing large amounts of data. Additionally, while most cloud storage services offer robust security features, it’s essential to ensure that your chosen service meets your specific security requirements.
Automated and Automatic Backups
Automated and automatic backups are essential for ensuring the security and integrity of your WordPress site. A good WordPress backup plugin should offer automated scheduled backups, allowing you to set a schedule that suits your needs. Incremental backups are also important, as they only back up changes made since the last backup, reducing storage space and improving efficiency. In this section, we’ll explore the different types of automated backups available and how to set up a schedule that works for you.
Automated backups take the hassle out of the backup process by running on a predefined schedule. This means you don’t have to remember to back up your site manually, reducing the risk of forgetting and potentially losing valuable data. Most WordPress backup plugins, like UpdraftPlus, allow you to set up automated scheduled backups with just a few clicks.
Incremental backups are a type of automated backup that only saves changes made since the last backup. This method is more efficient than full backups, as it reduces the amount of data that needs to be stored and transferred. Incremental backups are particularly useful for large websites with frequent updates, as they minimize the impact on server resources and storage space.
To set up automated backups, start by choosing a reliable WordPress backup plugin that supports scheduled backups. Configure the plugin to run backups at intervals that suit your needs, whether that’s daily, weekly, or monthly. Make sure to test your backup schedule to ensure that it’s working correctly and that your backups are being saved to a secure location.
WPvivid Backup Page
The WPvivid Backup page provides a plethora of both manual and automatic backup options, along with restore functionalities for your databases and WordPress files. You have the liberty to select from a mix of restore methods and specify where you’d like to save your backup files—either on local storage or remote options like FTP, SFTP, Google Drive, Dropbox, and others. Additionally, WPvivid Backup supports remote storage backups, allowing for seamless integration with various cloud storage providers without the need for premium upgrades.
To initiate the manual backup, choose your desired settings and click the “Backup Now” button. Be aware that completing the backup process could take some time.
WPvivid Backup Updates Page
This page serves users with alerts, notifications, and options for updates. Initially, you’ll encounter a notice indicating that a WordPress update is ready, accompanied by a message that provides a link to the newer WordPress version.
Automatic scheduled backups are crucial for maintaining data security, as they automate the backup process with customizable schedules, ensuring ongoing protection without manual action.
To employ automatic backups before going through with the update, click on the “how to backup your WordPress website” link. This action will automatically kickstart the backup procedure. Allow a few moments for the WordPress update to finalize. You’ll also find options here to refresh any outdated plugins or theme extensions.
Checking on the Backups Update Status
To proceed with the process of backing up your WordPress website, it is essential to conduct a test check. Start by selecting the backup, update, and other relevant options that suit your website’s needs. Next, access the WordPress Dashboard and look for updates. You can do this by following these steps:
- Locate the dashboard icon on your WordPress site.
- Go to the home page and access the subcategories.
- Select the “Updates” option from the drop-down menu.
Once you have taken these steps, the website will provide notifications and alerts to keep you informed about the status of your WordPress website updates. Finally, navigate to the updates page to complete the process.
How to Navigate the WordPress Updates Page
The WordPress Updates page provides a clear and concise overview of your website’s update status. A bold heading will indicate whether you have the latest WordPress version installed. Additionally, if necessary, you may be prompted to reinstall the newest version from this page.
The updated status of your plugins and themes will also be displayed on this page. To ensure that your website remains up-to-date, the “Check Again” feature is available for you to perform future test checks at any time.
Methods for Creating a Backup
Fortunately, there are various methods of backing up your WordPress website. In technical terms, automated processes via plugins and manual techniques, such as via FTP clients and cPanel, enable WordPress users to have many options to back up their website content. For a tutorial on how to manually backup your WordPress website update and your WordPress files and database, watch the video below.
It is crucial to select the best WordPress backup plugin to ensure effective data protection, as it offers ease of use, reliable performance, and essential features like automatic backups and offsite storage.
Use a Plugin
As recommended, plugins are a convenient method of regularly backing up your WordPress site, often automatically. There are many free WordPress plugins available individually to do a full backup of your website, including your database. Backups can typically be downloaded as a .zip archive file. Conversely, these plugins usually offer a feature enabling you to restore a backup from a .zip file. One highly recommended option is the UpdraftPlus WordPress backup plugin, known for its ease of use, customizable settings, and ability to integrate with various cloud storage services. Listed below are five highly used WordPress plugins designed to backup your site.
Different Plugin Options
1. UpdraftPlus: UpdraftPlus is one of the highest-ranking backup WordPress plugins in the world. Likewise, many technological institutions, such as NASA and Microsoft, rely on this popular plugin. Both free and premium versions of the plugin are available for installation onto your WordPress site.
2. BackWPUp: Like most WordPress backup plugins, BackWPUp allows users to set automatic backup schedules for their site easily. The pro version of BackWPUp also provides full user support and useful additional features to maintain website security to the fullest.
3. BackUpWordPress: “BackUpWordPress” is reliable and a free plugin. It also comes with automatic scheduling of site backups. Notably, its disadvantage for the free version of BackUpWordPress is non-cloud supportive. So, investing in the premium plugin is worth the cost and offers better features.
4. Duplicator: This free plugin allows users more functionality in their backups. It quickly clones, migrates, and redistributes its WordPress site with ease. However, users must upgrade to the pro version to unlock the popular automatic scheduling feature for this plugin.
5. All-in-One WP Migration: Lastly, All-in-One WP Migration is a better simple-to-use plugin. Due to its feature, it better enables users with the backup of WordPress websites. With a simple drag and drop actions, users are free to backup without restriction. Also, the plugin complies with all hosts. Lastly, the premium version offers cloud transfer services.
6. Jetpack Backup: Jetpack Backup is a reliable solution for website backups and restores. It offers automated backup capabilities and offsite storage, integrating seamlessly with the Jetpack suite for enhanced performance and security. However, it is important to note that Jetpack Backup may exclude some important WordPress core files, which could be a limitation for users needing comprehensive backup solutions.
Best Practices for Backing up Your WordPress
Backing up your WordPress site is just the first step in ensuring its security and integrity. To get the most out of your backups, it’s essential to follow best practices. This includes storing your backups offsite, using a reliable WordPress backup plugin, and testing your backups regularly. In this section, we’ll provide tips and advice on how to get the most out of your WordPress backups and ensure your site is always protected. By following these best practices, you can ensure that your WordPress site is always safe and secure, and that you can quickly restore it in case of a disaster.
First and foremost, always store your backups offsite. This means saving your backup files to a remote location, such as a cloud storage service or an external hard drive. Offsite backups protect your data from local server failures, hardware issues, and other on-site disasters.
Using a reliable WordPress backup plugin is crucial for ensuring that your backups are complete and accurate. Choose a plugin that offers automated scheduled backups, incremental backups, and integration with cloud storage services. Regularly update your backup plugin to ensure it remains compatible with the latest version of WordPress and any other plugins you use.
Testing your backups is an often-overlooked but essential step in the backup process. Regularly restore your backups to a test environment to ensure that they are working correctly and that you can successfully recover your site in case of an emergency. This practice will give you peace of mind and help you identify any potential issues before they become critical.
By following these best practices, you can ensure that your WordPress site is always protected and that you can quickly recover from any data loss or other disasters.
Manually Export your Site’s Database
Essential backup practices are to backup website databases regularly. Thankfully, many WordPress plugins speed up the backup process.
However, users must develop an understanding of website databases to directly manage a backup.
Guide to Manually Creating a Backup File of Your Entire Website
Follow these detailed steps to manually create a backup file of your entire WordPress website and its database onto your computer. Maintaining a well-organized backup archive is crucial for efficient restoration and management of your backups over time.
Backing up Database Through cPanel
- Sign in to your cPanel admin account, provided by your web hosting service.
- Navigate to the “Databases” dropdown menu and choose the “phpMyAdmin” option.
- In the phpMyAdmin interface, locate your WordPress website’s database from the list on the left-hand side.
- Click on the “Export” tab. In the subsequent dialog box, set the Export method to “Quick” and the Format to “SQL.” Press “Go,” and a SQL file will start downloading. Ensure that all database tables are included in the backup to avoid issues during restoration, especially for complex sites like WooCommerce.
- Once downloaded, move this backup file to a folder on your computer labeled “Database.” The file should have a .sql extension for easy identification.
Exporting Website Files Using an FTP Client
FTP (File Transfer Protocol) is a valuable tool for WordPress developers, offering connectivity between live website servers and a local computer. With FTP credentials set up on servers, users can easily download site directories and transfer them to different locations as backup files. This is a highly effective backup method, except when using cPanel or plugins. However, be aware that FTP transfer times can be lengthy, which may lead to some user impatience. For a complete backup, it is crucial to secure all essential components, including the site’s files, themes, plugins, and databases.
Popular FTP Clients:
Here’s a list of popular FTP clients you can use to facilitate this process: – (list of FTP clients)
These FTP clients are compatible with various web hosts, making it easier to manage your backups regardless of your hosting provider.
By following these steps, you’ll have manually backed up the entire website, ensuring you have both the database and site files as backup files on your computer.
1. WinSCP
Mainly, this FTP client is a powerful tool for Windows users. It has an easy-to-use interface design with a wide range of features. Moreover, its compatibility with various protocols makes WinSCP essential for all WordPress users. Additionally, WinSCP allows users to back up their data to their own servers, ensuring secure and efficient backups.
2. Cyberduck
On the other hand, Cyberduck optimization design works for both Windows and Mac. Plus, its seamless integration with the local environment in Mac computers makes it an obvious choice for Mac users. Additionally, Cyberduck also supports a wide range of host servers. It is also compatible with various remote storage providers, enabling efficient management of backups with services like Google Drive and Amazon S3.
3. FileZilla
Next on the list is FileZilla. The program is compatible with multiple host computers and is very popular for Linux users. Perspectively, it is common that web developers gravitate towards this option for user-friendly plugins and functionality in features. FileZilla also supports various cloud storage options, making it convenient for integrating backups to ensure data security.
Transferring via FTP
Manual data transfer sites via FTP include essential rules. First, FTP users are to download the entire site’s file directory for proper installation. In simmer terms, this consists of the WordPress Core Installation. The actual files for the WordPress CMS include WordPress Plugins folder, WordPress Themes folder, and media assets. Second, website backup and retrieval are its WordPress database. To clarify, the MySQL database stores WordPress site content, such as posts, comments, user accounts, and other data. If everything is in order, downloading website content from web servers is a relatively simple process. The initial backup is crucial as it ensures that only changes to files are backed up subsequently, optimizing storage and efficiency.
Transfer FTP Steps
- If FTP client is not connected, log in with FTP credentials. In detail, the web hosting provider provides FTP credentials. Designate a folder on your computer that contains site files and databases. Subsequent backups will be more efficient and take significantly less time than the initial transfer.
- Open your FTP client. Typically, local servers are on user screens. Correctly, the screen displays local servers on the left-side panel and the server on the right-side panel.
- On the right panel, locate the “public_html.” The folder holds user site files. Next, transfer data into the designated folder on your local computer. Afterward, drag the selected folder onto the left panel.
Download Backup from cPanel
Downloads are possible from cPanel. This feature assists users in the process of downloading full website backups. In fact, it applies to all websites. For example, sites built via the WordPress platform are cPanel friendly. Correspondingly, WHM and InterWorx offer cPanel for web hosting control panels. It is crucial to securely save backups after downloading them from cPanel to ensure they are stored efficiently and safely.
Deleting WordPress Sites
To restore a backup version of your WordPress site also includes a removal of the WordPress site. First, you must remove the current version from the web-server. To accomplish this, you must wipe two components of your live website: the file directory and database. Before continuing with the deletion process, there are two rules of thumb to follow. Ensure that you delete all WordPress core files to prevent any incomplete removal of the site.
Preparing to Delete WordPress
First, make a backup of your existing WordPress site. For data safety, step number one saves unfamiliar users from damaging or losing data. Second, note the names of the current database and its user(s) (all of which is information that will be useful later). For an in-depth tutorial on deleting your files and database, watch the video below.
Before deleting the site, ensure you verify existing backups to prevent any data loss.
Deleting Your Website Files
Finally, users are ready to clean WordPress off their computers. First, users begin removing all associated files from the website. This includes any web-based content related to your sites, such as your blog posts, themes, and plugins. Users quickly complete file removal through cPanel and web hosting platform account use. It is important to avoid relying on partial backups during this process, as they can lead to unreliable restores and incomplete file removal.
- After logging into your web hosting account, open the File Manager.
- Locate your website within your file directory.
- Select all existing files—hold the SHIFT key and select the first and last file to highlight all.
- Select the “Delete” button—you may have to right-click “Delete.”
Deleting Your Database
Lastly, the final step to entirely removing site content is to cancel the database. Mostly, users will find that website data remains while the live site vanishes. To check website data, refresh the site after wiping the files. It is crucial to verify your backup storage before deleting the database to ensure data safety.
- Within cPanel, select “MySQL Databases” under the Databases dropdown menu.
- Identify your database (if there are multiple databases on the web-server, you can search for your database with the name you noted earlier).
- Delete the database.
Deleting Website Data
Before proceeding to the backup site, it is essential to delete additional website data. For thoroughness, other users of your website must be removed. First, simply scroll down to the Current Users subsection on the same page. Second, identify the user(s) that had access to the WordPress database. In essence, users should reference the usernames noted earlier. Lastly, select the “X” icon to remove this user.
Before deleting any website data, it is crucial to utilize backup services to ensure that all important information is safely stored.
Restoring from a Backup
Generally speaking, all of the backup methods have complementary features for restoring from a backup (typically a .zip file). In the case of FTP, simply start by transferring the backup directory (unzipped) over to the server. Under these circumstances, many backup plugins listed also offer features to restore your site within the same plugin. Similarly, WordPress users can regain their WordPress sites and databases to previously backed-up versions via FTP and cPanel. For an in-depth tutorial on restoring WordPress files and database from a backup, watch this video below.
It is crucial to ensure reliable backups to guarantee successful restoration without compromising site performance.
Fdev
Restoring Website Files from a Backup Version via FTP
Reasonably, restoring files from FTP backup versions are also an option. Surprisingly, uploading the site’s backed-up files from the local server is very simple if you have used an FTP client to back up your WordPress site. By comparison, it is the same process of traditional backups, but in reverse. First, select the files you wish to transfer from your local server. Second, move files to a remote server. Lastly, drag files from the remote server into the proper directory folder.
Additionally, using backup services can ensure that your data is safe and easily restorable during the restoration process.
Restoring Website Files from a Backup Version via cPanel
Alternatively, cPanel backups are a great substitute to restore websites. Without a doubt, restoring your WordPress site files is a relatively simple process. First, users will remain within the same window they deleted their data in. As a reminder, ensure that old WordPress files have been removed from proper removal processes before continuing with the restoration process. Using remote storage for backups can enhance data safety and accessibility during the restoration process. Take a look at the steps to restore data from a cPanel backup.
- Within the same File Manager in cPanel, select the “Upload” button from the menu options.
- In the window, upload your site backup (in .zip file).
- When the .zip file appears in your directory, “Extract” the internal data. It is recommended to remove the .zip file from your web server after the extraction process is completed.
Restoring Database from a Backup Version via cPanel
To continue, reverting WordPress databases back to a prior version is relatively straightforward. As a precaution, users require confirmation of having existing downloaded data from the files before restoring to previous databases. The existing files are data identifiable in locations on computers. These simple steps will ensure users how to restore the data on cPanel. It is crucial to ensure that you restore the entire WordPress site, including all files, themes, plugins, and databases, to maintain the integrity of your website.
- Log into your cPanel account.
- Select “Backup” under the “Files” dropdown menu.
- Scroll down until you locate the subheading “Restore a MySQL Database Backup.”
- Select “Choose file” and locate the appropriate database files, which should be easily found on your computer.
- Select “Upload” to finish the process.
Conclusion
In conclusion, backing up your WordPress website is an essential task that should not be taken lightly. A backup ensures that all your website data, including posts, pages, themes, and plugins, can be restored in case of any disaster, such as a server crash or hacker attack. You can use various methods to back up your website, including plugins, manual backups, or a combination.
Regardless of your chosen method, it is crucial to update your backups regularly and store them securely. Doing so can minimize the risk of losing valuable data and prevent downtime that can negatively impact your online presence and reputation. In conclusion, back up your WordPress website today and ensure the safety and security of your website data. It’s always better to be safe than sorry, so don’t wait until it’s too late to take action. Choosing the best backup plugins is essential for effective data protection and can provide tailored solutions to meet your specific needs.